Why LC and SC Coexist
SC (Subscriber Connector or Square Connector) was the dominant format from the late 1990s through about 2010, especially in carrier and FTTH applications. Its 2.5mm ceramic ferrule is the same size used in FC and ST connectors, which made the cleaner ecosystem economical for installers handling multiple legacy formats. SC remains common in FTTH drop and trunk cabling, where panel density is not a concern.
LC (Lucent Connector or Little Connector) was introduced as a high-density alternative with a 1.25mm ferrule in a body half the width of SC. Two LC ports fit in the space of one SC, so a 24-port SC patch panel becomes a 48-port LC panel. The format quickly became the default for data centers, enterprise structured cabling, and high-port-count switching equipment.
Both share the same UPC and APC polish options, the same IEC pass/fail criteria, and the same cleaning protocol structure. What differs is the physical tooling and the access strategy.
Ferrule Size: 2.5mm vs 1.25mm
The ferrule is the cylindrical sleeve that holds the fiber and presents the polished end-face. SC and LC ferrules differ by exactly a factor of two in diameter, which has cascading effects on every cleaning tool.
2.5mm SC Ferrule
The original ceramic zirconia ferrule diameter, shared with FC and ST. The 2.5mm size matches the 2.5mm cleaning surface inside a 2.5mm one-click cleaner. The ferrule projects far enough beyond the connector body that you can see and reach it with most tools. The CLEP 2.5mm Mini Cleaner handles SC, FC, and ST in a single tool.
1.25mm LC Ferrule
Half the diameter of SC. The smaller ferrule is the entire reason LC achieves higher density. A 2.5mm cleaner pushed onto a 1.25mm ferrule cannot make full contact because the cleaner ribbon is sized for the larger surface. Use the CLEP 1.25mm Mini Cleaner for LC connectors, which has a 1.25mm cleaning aperture sized correctly.
Why Size Matching Matters
The cleaning ribbon inside a one-click cleaner advances a fresh section across the ferrule when you press and click. The fresh section is sized to match the ferrule diameter. A 2.5mm cleaner used on a 1.25mm LC pushes a section larger than needed against the smaller ferrule, with the result that the ferrule edges contact only the center of the ribbon while the outer regions of the ribbon contact the connector body or air. The clean is incomplete and the cleaner cassette is wasted.
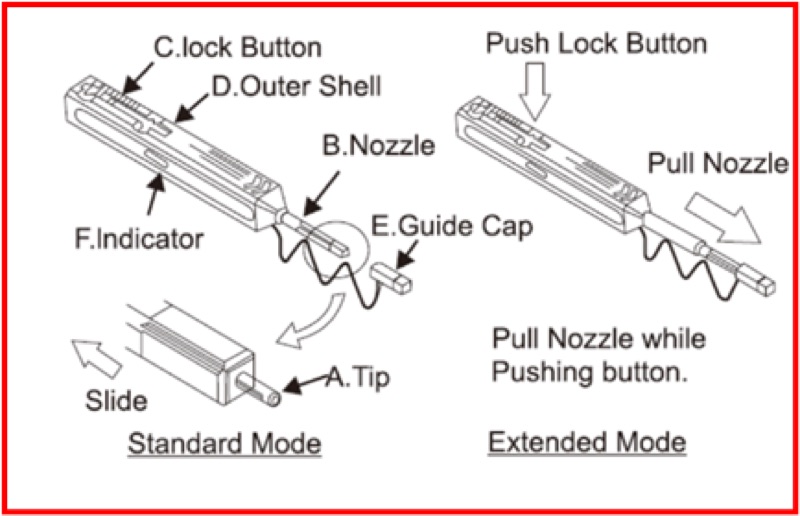
Access Strategy: Mini vs Long-Reach
The choice between mini and long-reach cleaners depends on where the connector is and what is in front of it.
Mini Cleaners
Compact form factor, typically 4-5 inches long, designed for exposed connectors on patch cords or single-port adapters. Use the mini for cleaning patch cords on a bench, drop cables in an FTTH residential install, or any connector you can directly grasp.
Long-Reach Cleaners
Extended barrel, typically 6-8 inches, designed to reach connectors recessed inside high-density panels, blade switches, or enclosed cassettes. The cleaning mechanism is identical to the mini; the longer body simply lets the cleaning head reach where your hand cannot. The CLEP 2.5mm Long-Reach Cleaner and CLEP 1.25mm Long-Reach Cleaner are the workhorses for data center patch panel work.
SC Tends to Be Mini, LC Tends to Be Long-Reach
SC connectors are usually visible and accessible because of the lower port density of SC panels. A mini cleaner reaches them easily. LC connectors are more often deep inside high-density panels where a mini cleaner cannot reach. Most LC field work uses long-reach cleaners.
LC vs SC Cleaning at a Glance
The protocol is the same; the tooling and access strategy change.
| Factor | SC | LC |
|---|---|---|
| Ferrule Diameter | 2.5mm | 1.25mm |
| Required Cleaner | CLEP 2.5mm | CLEP 1.25mm |
| Typical Density | Low (12-24 per RU) | High (48-96 per RU) |
| Mini or Long-Reach | Mini usually sufficient | Long-reach often needed |
| Inspection Tip | 2.5mm Universal | LC/APC Male or Female |
| Common Polish | SC/UPC and SC/APC | LC/UPC and LC/APC |
| Wet Clean Procedure | Identical | Identical |
SC Cleaning Procedure
Step 1: Inspect
Use a 2.5mm-compatible inspection scope to view the SC end-face at 200x. Identify contamination type. SC connectors are usually accessible enough to inspect with a standard handheld scope.
Step 2: Dry Clean
Hold the SC connector by its housing. Push the 2.5mm one-click cleaner straight onto the ferrule until you feel the click. Single push, single click.
Step 3: Re-Inspect
If the end-face passes IEC 61300-3-35, mate the connector promptly. If contamination remains, escalate to wet clean.
Step 4: Wet Clean (If Needed)
Apply 99% IPA to a lint-free wipe. Touch the wet section to the SC ferrule and rotate the connector slightly. Move to a dry section of the wipe and dry-wipe. Immediately follow with a 2.5mm dry click.
Step 5: Final Inspection and Mate
Re-inspect to confirm PASS. Mate the SC connector promptly. SC connectors latch positively with a push-pull mechanism, so confirmation of mating is tactile.
LC Cleaning Procedure
Step 1: Inspect
Use the correct LC inspection tip on your scope. The LC/APC Male Tip mates with bulkhead-mounted LC/APC adapters; the LC/APC Female Tip receives an LC/APC patch cord. UPC LC connectors use the equivalent UPC tips.
Step 2: Choose Mini or Long-Reach
If the LC connector is on a patch cord on a bench, use the mini. If it is in a high-density panel or behind a cassette, use the long-reach. Pushing a mini into a tight panel risks crushing your fingers and producing an incomplete clean.
Step 3: Dry Clean
Push the 1.25mm cleaner straight onto the ferrule until the click. Hold the LC connector by its housing or use the panel adapter to stabilize during cleaning. The smaller LC ferrule is sensitive to off-axis pressure; keep the cleaner perpendicular.
Step 4: Re-Inspect
Capture the inspection image. If PASS, mate. If FAIL, identify contamination type and escalate.
Step 5: Wet Clean (If Needed)
LC's smaller ferrule and tight access make wet cleaning trickier than SC. Use a small amount of 99% IPA on a lint-free wipe and dab rather than wipe. Follow immediately with a 1.25mm dry click.
Step 6: Final Inspection and Mate
Re-inspect to confirm PASS. Mate the LC connector. The LC latch is a small lever that must be aligned with the panel; verify positive engagement before releasing.
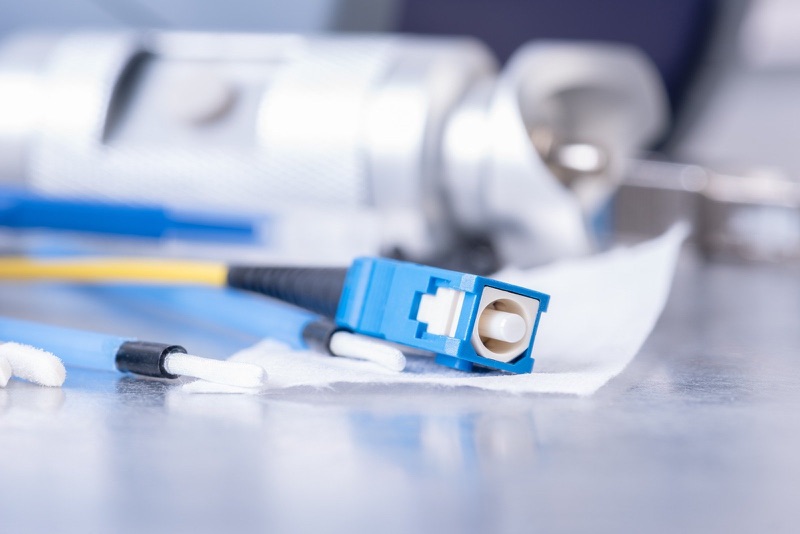
Patch Cord Cleaning Reality
Patch cords are the most-mated, most-handled, and most-contaminated fiber components in any installation. Both SC and LC patch cords need cleaning before mating, every time.
For routine SC patch cord work, a multimode OM4 simplex jumper or single-mode LC/APC duplex jumper from a sealed bag is clean enough to mate without cleaning. Once mated and unmated, that cleanliness is gone.
For LC patch cord work in data centers, the volume of patch operations means cleaners get a workout. The LC/APC jumper is one of the most commonly-handled fiber components, and every mating cycle is an opportunity for contamination transfer if cleaning is skipped. For more on the cleaning protocol that applies to all patch cord work, see How to Clean Fiber Connectors.
Field Kit for Mixed LC/SC Work
Most field techs work in environments that include both SC and LC connectors. Carry both ferrule sizes plus inspection capability:
SC/FC/ST Cleaning
Mini for accessible connectors, long-reach for recessed.
LC/MU Cleaning
1.25mm cleaners; long-reach is mandatory for high-density panels.
Universal Backup
Reel-style cleaner that handles both sizes as a backup or for mixed work.
Opti-Fiber Cleaner ($69.99) or pre-built Fiber Cleaning Kit ($99.99)
The Bottom Line
LC and SC share the same cleaning protocol, the same IEC pass/fail criteria, and the same dry-wet-dry escalation logic. They differ in ferrule size and physical access, which means different cleaners and different reach lengths. Carry both.
For deeper context on each step of the cleaning workflow, see Fiber Optic Cleaning Best Practices and Wet vs Dry Fiber Cleaning. For inspection that pairs with cleaning, see How to Inspect Fiber Connectors with a Microscope.