Why V-Grooves Are Critical to Splice Quality
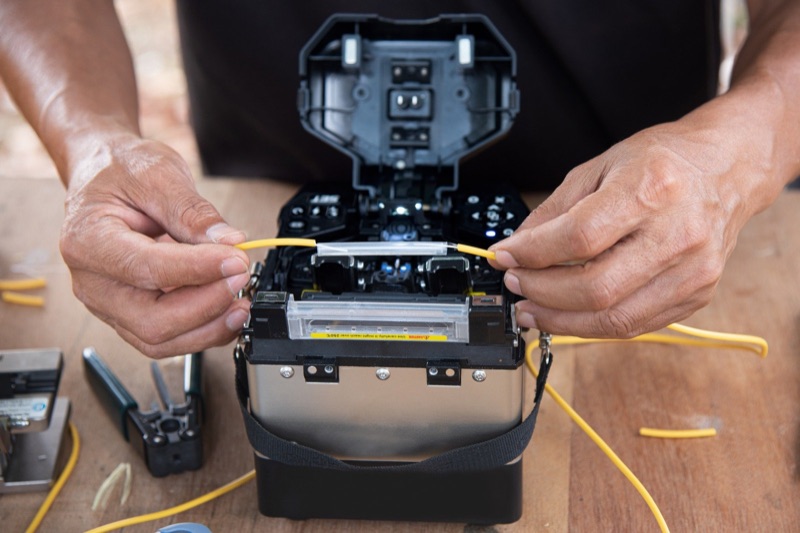
The v-grooves are the precision-machined channels that hold the bare fiber in place during alignment and fusion. They are typically machined into a hardened metal block (often a ceramic or hardened steel composite) with sub-micron precision. The bare fiber, 125 micrometers in diameter, drops into the v-groove and is pressed down by the fiber clamp. Gravity and the clamp pressure seat the fiber against the two angled walls of the groove, putting the fiber at a precise, repeatable height and lateral position.
This is the reference position from which the splicer's cameras and motorized stages perform fine alignment. If the fiber is not seated correctly in the v-groove, the cameras still see the fiber, the alignment routine still runs, but the starting position is wrong and the alignment correction cannot fully compensate. The result is misaligned cores at the splice point and elevated splice loss.
Anything in the v-groove that lifts the fiber off the reference walls causes this problem. A piece of buffer coating residue, a small fiber scrap, dust, or even a fingerprint can be enough to disrupt alignment.
What Contaminates V-Grooves
Fiber Scraps
The most common v-groove contaminant. When you remove a spliced fiber pair from the splicer, small glass shards from the cleaved end-faces can dislodge and fall into the v-grooves. Over many splices, scraps accumulate. They are nearly invisible -- a few hundred micrometers of bare fiber against a metallic v-groove surface is hard to see without magnification.
Buffer Coating Residue
If your stripping leaves trace amounts of coating on the bare fiber, that coating contacts the v-groove during placement. Over time, coating residue builds up on the v-groove walls, gradually changing the effective groove geometry.
Dust and Airborne Particles
Field environments are dusty. Even with the windshield closed during splicing, opening it to load fibers exposes the v-grooves to dust. Outdoor splicing in dry, windy conditions accelerates dust accumulation.
Skin Oil and Fingerprints
Touching the v-groove area with bare fingers transfers oil. The oil is invisible but creates a thin film that affects fiber positioning.
Cleaning Solvent Residue
Counterintuitively, cleaning can leave residue. If you flood the v-grooves with IPA or use a dripping-wet swab, the solvent can wick into the splicer mechanism and leave deposits as it dries. Use just-damp swabs, not soaked.
Symptoms of Dirty V-Grooves
The clearest sign is unexplained splice failures despite good fiber prep. If your cleave looks good, your fiber is clean, your electrodes are within their service life, and your splicer arc calibration is current -- but splices are failing or showing inconsistent loss -- the v-grooves are the next thing to check.
- Splicer reports excessive offset: The splicer's image processing detects that the fiber is not where it expects to be in the v-groove. Some splicers display "fiber offset" or "alignment error" messages.
- Visual fiber misalignment on the splicer screen: Looking at the splicer's display before the arc, the fiber is visibly off-center or tilted in the v-groove.
- Bidirectional offset: The fiber is offset in the same direction on both sides of the splice (because both v-grooves have the same kind of contamination).
- Inconsistent splice loss: Some splices pass, some fail with no obvious pattern. The contamination may be moving around as fibers are loaded and removed.
- Higher loss after a long session: Splice quality degrades over the course of a day as scraps accumulate in the grooves.
The V-Groove Cleaning Procedure
Step 1: Power Down (Optional)
Some splicer manuals recommend powering down for cleaning; others allow cleaning with the splicer powered. Powering down ensures no accidental motor movements while you have a swab in the v-groove. If you leave power on, do not press any buttons during cleaning.
Step 2: Open and Inspect
Open the windshield. Lift the fiber clamps to access the v-grooves. Use the splicer's display zoom feature (or an external loupe) to inspect the v-grooves at high magnification. Look for:
- Fiber scraps (thin glass slivers)
- Coating residue (yellow or off-white deposits)
- Dust accumulation
- Discoloration or buildup on the v-groove walls
Step 3: Remove Visible Debris
If you see a fiber scrap, do not try to grab it with tweezers -- you risk scratching the v-groove. Instead, use the edge of a folded lint-free wipe or the side of a clean cotton swab to sweep the scrap out of the groove. Sweep gently, in the direction of the open end of the groove, so the debris falls out rather than getting pushed deeper.
Step 4: Wet Clean with IPA
Moisten a clean cotton swab with 99% IPA. The swab should be damp, not dripping wet. Run the swab gently along the length of each v-groove, applying light pressure. Use a fresh swab tip for each groove (do not re-use a contaminated swab). Rotate the swab as you move it to expose fresh swab surface to the contamination.
Step 5: Clean the Fiber Clamp Surfaces
While you have the cleaning supplies out, swab the underside of the fiber clamps. The clamp surface contacts the bare fiber when closed, so contamination on the clamp can transfer to the fiber and mess up alignment.
Step 6: Allow to Dry
IPA evaporates quickly but not instantly. Leave the windshield open for 30-60 seconds before loading fibers. Loading fibers while the v-grooves are still wet will trap solvent under the fiber.
Step 7: Test with a Practice Splice
Run a test splice on scrap fiber to verify the cleaning was effective. Loss should return to normal. If loss is still elevated, repeat the cleaning -- you may have missed a piece of debris -- or move on to checking electrodes (see fusion splicer electrode replacement).
How Often to Clean
| Environment | Cleaning Frequency | Notes |
|---|---|---|
| Clean indoor lab/training | Daily at session start | Quick visual inspection sufficient most days |
| Splicing table indoor | Daily + every 100 splices | Building HVAC dust accumulates |
| OSP field (manhole, pedestal) | Every 50 splices or 2 hours | High-debris environment |
| Aerial / pole work | Every 50 splices | Wind brings constant new contamination |
| Dusty / construction site | Every 25-50 splices | Drywall dust is especially problematic |
| After splicer is stored | Before first session | Even with case closed, dust settles |
Other Internal Areas to Maintain
While you have the splicer open, take a few minutes to check other internal components.
Cameras and Mirrors
Most splicers use two cameras (X and Y views) and small mirrors to image the fiber alignment from two perpendicular angles. The mirrors and camera lenses are inside the splicer body, typically protected by small windows. If these become contaminated, the camera image becomes blurry or distorted, which prevents accurate alignment. Clean the visible mirror surfaces with a lens cleaning swab and 99% IPA, using very gentle pressure. Refer to your splicer manual for the exact location and recommended technique.
Splice Sleeve Heater Oven
The heat-shrink sleeve oven accumulates residue from melted sleeve adhesive over hundreds of cycles. A buildup in the oven can interfere with sleeve placement or heat distribution. Clean the oven with a dry lint-free wipe (no IPA -- the heating elements get hot enough to burn off residue, and IPA in the oven is a fire hazard). Some splicers have a removable oven liner; check your manual.
Battery Contacts
Field splicers use removable batteries. The battery contacts can corrode over time, especially in humid environments. Clean the contacts with a swab and IPA. Visibly corroded contacts may need replacement; corrosion increases contact resistance and reduces effective battery capacity.
Cooling Vents
Most splicers have small cooling vents that pass air over internal electronics. These vents accumulate dust over time. Clean the exterior vents with a soft brush. If the splicer has a removable filter (rare on field splicers), check the manual for replacement intervals.
Common Mistakes
- Using compressed air or canned air: The propellants leave residue on the v-grooves and on the cameras. The air pressure can also blow debris deeper into the splicer mechanism. Never use canned air on a fusion splicer.
- Using metal probes or picks: Tweezers, dental picks, and any metal probe will scratch the precision-machined v-groove surface. A scratch in the v-groove permanently degrades alignment accuracy. Always use cotton swabs or lint-free wipes only.
- Soaking the v-grooves with IPA: A dripping-wet swab can flood the splicer mechanism with solvent. The solvent then wicks into bearings, motor mounts, and electrical contacts, where it can leave deposits or cause corrosion. Use damp swabs only.
- Skipping the inspection step: Cleaning blind without inspecting first wastes time on areas that do not need cleaning and may miss debris in areas that do. Always look first, clean second.
- Re-using swabs: A swab that has just removed contamination is now itself contaminated. Re-using it on another v-groove just transfers the contamination from one place to another.
- Cleaning too aggressively: Hard rubbing in the v-grooves can wear down the precision surface or transfer cotton fibers from the swab. Use light pressure.
- Forgetting to dry: Loading a fiber while the v-groove is still wet traps solvent under the fiber, where it disrupts alignment and may damage the bare glass.
Build a Splicer Maintenance Kit
Keep the following items in or near your splicer case so you can clean at any time without searching for supplies.
- Lint-free cotton swabs (purpose-made fiber cleaning swabs preferred)
- Lint-free wipes (4x4 inch fiber cleaning wipes)
- 99% isopropyl alcohol in a sealed dispenser bottle
- A small loupe or magnifier (10x or higher) for inspecting v-grooves
- Spare electrodes (replacement pair, sealed in original packaging)
- Fiber waste container for cleaved fiber scrap
- Compressed gas duster -- specifically NOT for the splicer interior, but useful for cleaning the exterior case and case interior
For the broader splicing kit, see Fiber Splicing Kit. For inspection at high magnification, the WiFi Fiber Microscope works well for examining v-grooves and electrodes.
Related Maintenance Topics
- Fusion Splicer Electrode Replacement -- when and how to replace electrodes.
- Fusion Splice Troubleshooting -- common errors and how to fix them.
- How to Perform a Fusion Splice -- the complete splice procedure.
Frequently Asked Questions
How often should I clean my fusion splicer v-grooves?
Clean v-grooves at the start of every splicing session and any time you see splice failures with no obvious cause. In dusty field environments, clean every 50-100 splices. In a clean indoor environment, daily cleaning at session start is usually sufficient.
What do I use to clean fusion splicer v-grooves?
Use a clean cotton swab moistened (not soaked) with 99% isopropyl alcohol. Some splicer manufacturers supply purpose-made v-groove cleaning brushes -- these work well too. Never use compressed air, canned air, or any abrasive tool. Never use a metal probe to dislodge debris.
Why does v-groove contamination cause splice failures?
The v-grooves position the bare fiber for alignment with sub-micron precision. A piece of fiber scrap, a dust particle, or coating residue in the v-groove lifts the fiber off the reference surface, causing alignment errors that the splicer cannot correct.
Can I clean the splicer cameras and lenses?
Yes, with care. The cameras and lenses inside the splicer should be cleaned with a lens cleaning swab and 99% IPA, using minimal pressure. Refer to your splicer manual for the specific procedure -- some lenses are coated and require gentle handling.
What if I see fiber scraps stuck in the v-grooves?
Use the corner of a folded lint-free wipe or a soft cotton swab to gently sweep the fiber scrap out of the v-groove. Do not use tweezers, picks, or any metal tool -- you can scratch the precision-machined v-groove surface, which would permanently degrade splice alignment quality.
Shop Splicer Maintenance Tools
Splicing kits, fiber inspection scopes, and cleaning supplies for fusion splicer maintenance.